
My editor lives and breathes by our team's blog planning database in Airtable. And for good reason. It's got everything she needs to keep Zapier's blog running: every article pitched or written and by who, links to copy docs, assignment updates, publishing dates, CMS links—you get the idea.
I, on the other hand, need only some of that information to do my job effectively.
Rather than create a separate database, though, I can create a different view of it—one that displays only the info I need, in the order that I need, using the original table's underlying data.
Here, I'll walk you through everything you need to know about how to create and customize Airtable views.
Before we begin, it's helpful to be familiar with the other basic building blocks of any Airtable database: bases, tables, fields, and records. For a refresher, check out our beginner's guide on how to use Airtable.
Table of contents:
What are Airtable views?
Airtable views offer different ways of configuring (or viewing) your data. You can create multiple Airtable views—up to 1,000 per table in your base—customized to your specific needs. For example, you might use a calendar view to get a snapshot of upcoming product launch dates. Or you can create a Kanban view to quickly scan through the status of each task related to that project.
When you edit a record in one view, those changes will also appear across all views since each view relies on the same underlying data.
That's the beauty of Airtable: because Airtable views are highly customizable and flexible, you can use them to build a sales pipeline and CRM, an HR management tool, an editorial calendar, or anything, really.
How to create Airtable views
There are two main ways to create Airtable views:
How to create a new Airtable view
Here's how to create an Airtable view from scratch.
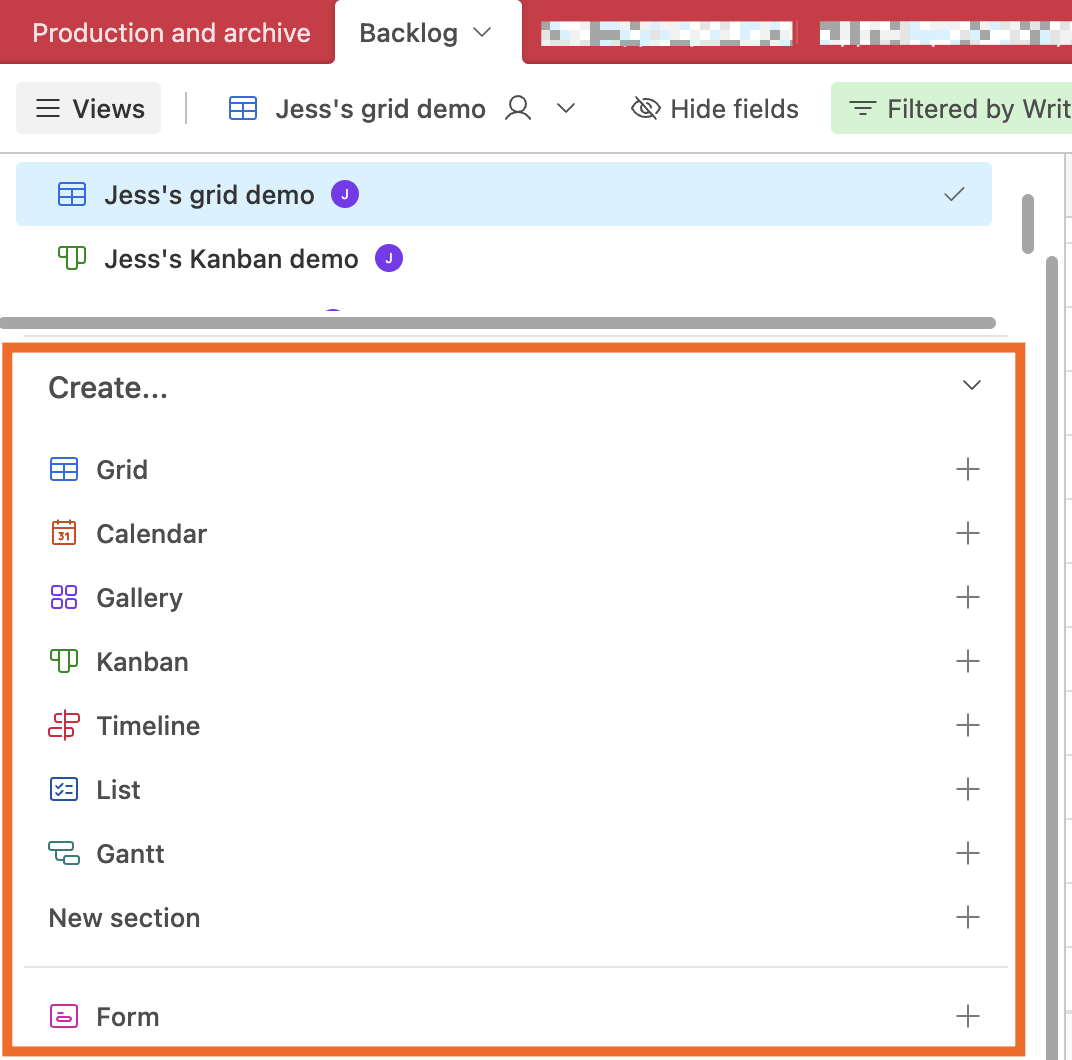
From any database table, click Views to open the Views pane if it's not already open.
Click your desired view in the Create section. (Jump ahead for a detailed breakdown of each view type.)
Enter a view name, and select who can edit the view:
Collaborative: All collaborators in the base can edit the views.
Personal: Only you can edit the view.
Locked: Nobody, including you, can edit the view. All collaborators, however, will still be able to view and make changes to the records.
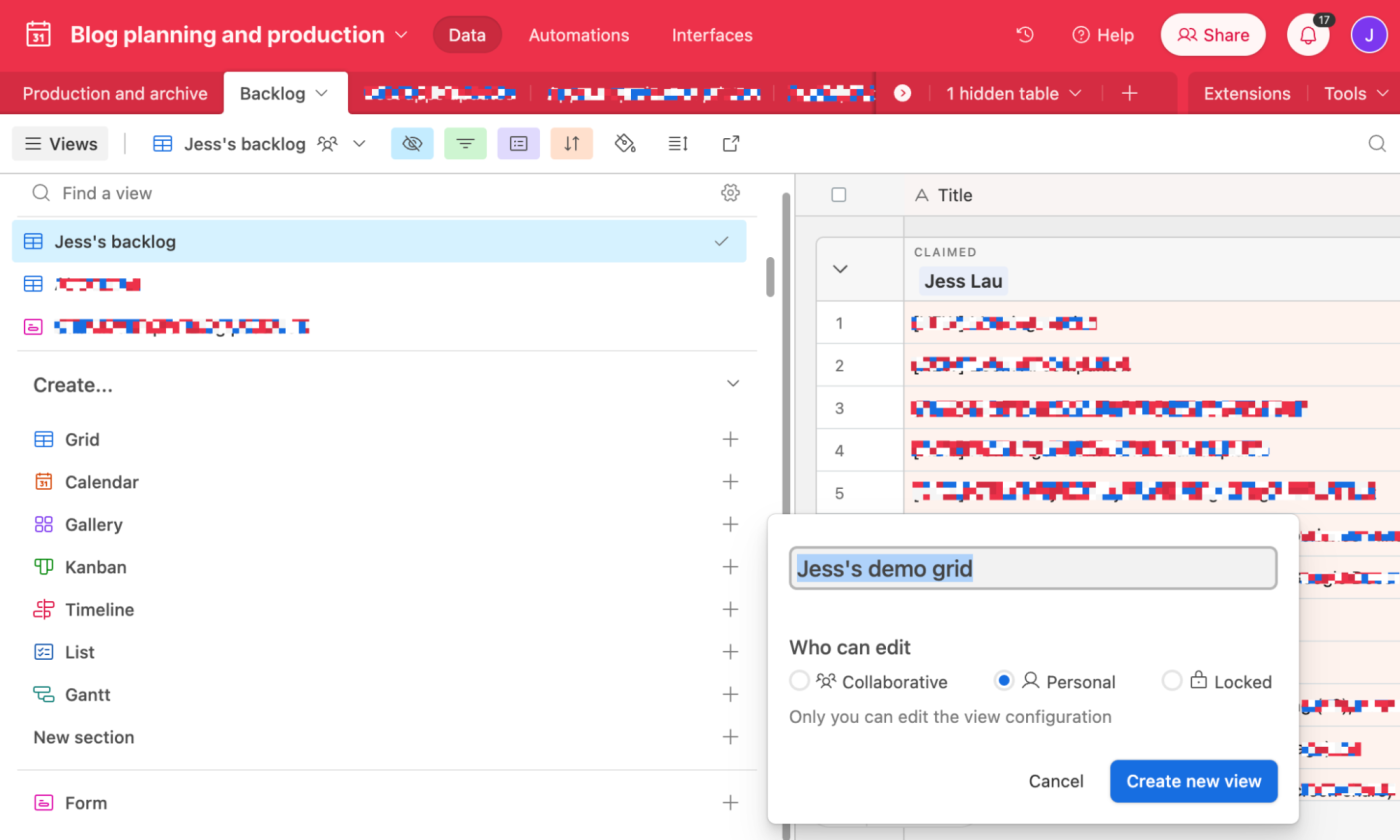
Click Create new view.
Depending on the type of view you created, Airtable may prompt you to customize a few more fields.


That's it.
How to duplicate an Airtable view
Let's say you're a writer and you have an existing Airtable view that displays all your writing assignments, including the article name, priority, and status, but it's filtered to display only records that have not yet been published. Now you want a view that shows all the same details—name, priority, and status—but you want to display only records that have been published. The quickest way to do this is to duplicate the view.
Right-click the name of the view you want to duplicate. Or, click the down caret (
∨) next to the view name above your table.Click Duplicate view.
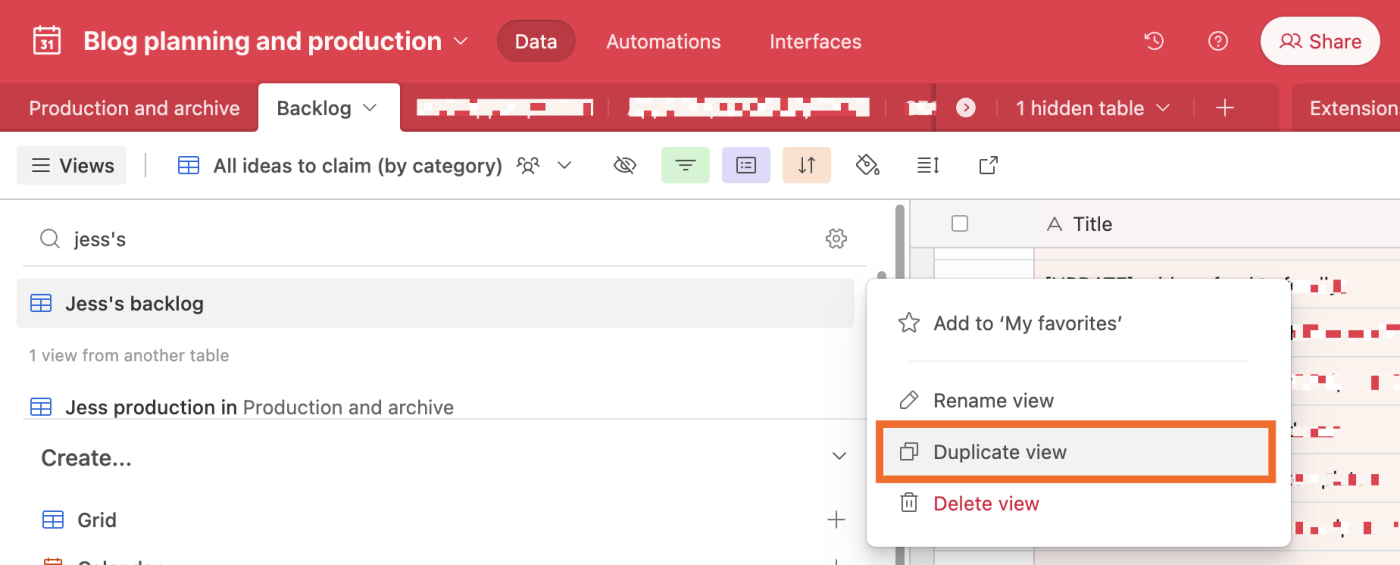
Rename the view, and adjust your filters as needed.

How to access and organize your Airtable views
To access a specific view, enter the name of the view in the Find a view search bar in the Views pane. Or scroll through all available views. By default, any personal views will appear under Personal views; collaborative and locked views will appear under Collaborative views.

If you have go-to views, you can also favorite them for easy access. Hover over the name of the view you want to favorite, and click the Add to 'My favorites' icon, which looks like a star. Or right-click the name and click Add to 'My favorites.'

To remove a view My favorites list, right-click the name of the view, and click Remove from 'My favorites.'
Alternatively, you can rearrange your views so that your most frequently used ones are at the top of your list.
In the All views section of your view sidebar, hover over the name of the view you want to reorder. Click the six-dot grid (⋮⋮) next to the view name, and then drag and drop it anywhere within its view group. You can only reorder views within their respective group. For example, you can't drag a view from your Personal views group and drop it in the Collaborative views group.

How to delete Airtable views
The simplest way to delete a personal or collaborative view is to right-click the view you want to delete, and then click Delete view.

To delete a locked view, you first have to unlock it.
Right-click the name of the view in the Views menu.
Click Locked view, and then click either Collaborative view or Personal view.
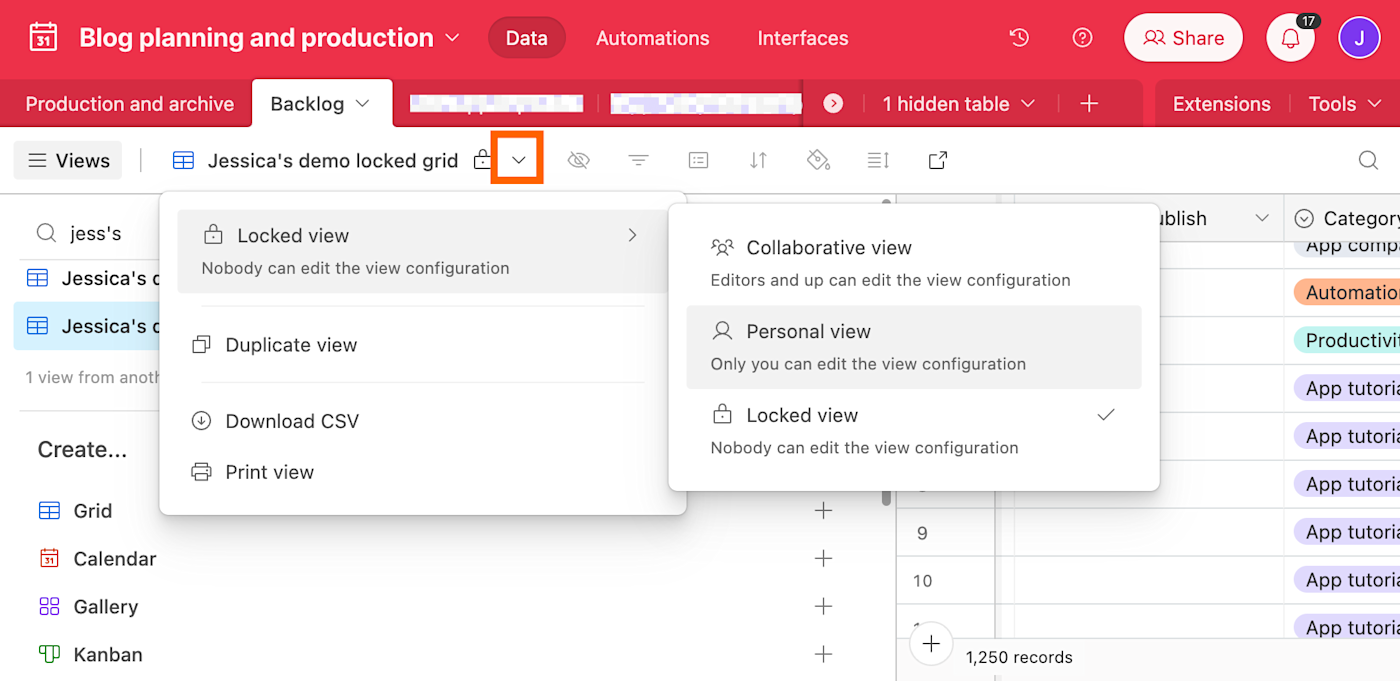
Click Unlock to confirm.
Now you can right-click the view name, and click Delete view.

Types of Airtable views
Here's a breakdown of the different types of Airtable views. It's worth noting that the Timeline, Gantt, and Form views are available only on paid plans.
Airtable grid view

The grid view is the default view in Airtable. It looks similar to a spreadsheet—each record is represented by a row and each field is represented by a column.
Because of the spreadsheet-like layout, this view might feel the most familiar. It's also the easiest view to import data into from other popular spreadsheet apps, like Google Sheets or Excel, because the layouts line up similarly.
Airtable calendar view

The calendar view displays your records in a calendar format, which makes it ideal for getting a snapshot of upcoming projects, tasks, and events.
To create a calendar view, you need to first add a Date field to your table. If your table contains multiple date fields, choose which date field to use in this view. As you add dates to your records, a condensed version of the record will appear in the appropriate spot on your calendar.
Click a record to modify the record name and date field. For an easier way to modify the date field, you can also drag and drop records from one date to another.

If you want a detailed view of that record, click the Expand record icon, which looks like two diagonal arrows pointing in opposite directions.

By default, the calendar is set to a monthly view. To change this, click Change timescale, and select how you want to view your calendar: Day, 3-day, Week, 2-week, Month, or Custom (choose from one to six days or weeks to display).
You can also click Collapse weekends to minimize the real estate those dates take up on your calendar. Or click Hide weekends to remove them from your calendar altogether.

Airtable gallery view

The gallery view displays your records as cards with a cover image at the top. To showcase an image on your card, first add an Attachment field to your table.
Although displaying an image is optional, the visual is the real draw of this view. It gives you an easy way to understand what that card is about. For example, an employee's profile photo lets you know that the card contains that employee's data. Or, as shown in the image above, the cover photo indicates what app a writing assignment is about.
Airtable Kanban view

The Kanban view displays your records as cards in different columns of your board. For example, your columns may be grouped by project status, assignee, or another single-select field from your table. To quickly reorganize your cards, you can click and drag a card to a different stack or reorder them within a stack.
By default, the cards will display only the record title. To change this, click Customize cards above your board, and select the fields you want to display on your cards.

If you're looking purely for a Kanban tool, check out our roundup of the best Kanban apps and best Trello alternatives.
Airtable list view

The list view lets you organize your records in an easy-to-read list—you can create a simple list or nested lists (parent lists with up to two sublists). Nested lists are great for visualizing projects with dependencies. If you create a nested list, you'll need to first link any tables you want to nest together. For example, you might link your table of marketing campaigns with your table of deliverables for that campaign.
By default, your list will display only the title of your record, but you can swap this out for another field or add more fields. You can also add a prefix—for example, a checkbox or dropdown select—next to each record. To do this, click Customize row, and edit your rows as needed.
Airtable form view

An Airtable form view lets you build a form that anyone can fill out—when they do, the information gets ported directly into that Airtable view. You can configure the view however you want; it's just that there's also a form attached to it.
Airtable timeline view

The timeline view lets you see projects on a horizontal scrolling timeline, which is handy for managing time-based projects like product launches and events.
To create this view, you'll first need to add start and end dates to your tasks. Then, group your records by any table field into visually distinct rows called "swimlanes." These swimlanes make it easier to understand what tasks are coming up and who's responsible for what, so you can coordinate tasks and allocate resources accordingly.
Airtable Gantt view

Similar to the timeline view, the Gantt view is useful for managing time-based projects. While the timeline and Gantt views look similar—both display records using a horizontal bar chart—there are a couple of key differences:
Swimlanes. Swimlanes correspond to a group of records in the timeline view, but only single records in the Gantt view.
Task dependencies. The Gantt view allows you to plot tasks and their dependencies, so you can visualize every step of a project from start to finish. The timeline view, on the other hand, provides more of a high-level overview of a given project.
How to customize Airtable views
There are countless ways to customize your Airtable views—it would be impossible (and frankly, a bit of a snooze) to detail every one. Instead, I'll go over how to use Airtable's customization tools, which you can access in the view bar. This way, you can pick and choose what to tweak to show exactly what you need.
Hide and reorder fields
By default, Airtable will include every field from your base table when you create a new view. If the base table includes a lot of fields—enough that you find yourself scrolling endlessly across to view everything—hide the irrelevant fields to keep things manageable.

The way to do this varies slightly depending on your view. For example, in view menu of a grid view, click Hide fields, and then click the toggle next to any field you want to hide. In gallery or Kanban view, click Customize cards, and then select which fields to hide. If neither of those options are visible, look for some version of Customize [rows, labels, columns, or cards] in the view menu.

If your base table includes a lot of fields and you want to view only a few, I recommend first clicking Hide all to deselect everything, and then clicking the fields you want to include.
You can also reorder fields so that the most relevant information is immediately visible. The easiest way to do this is directly within your view: drag and drop each field to your desired position.

Alternatively, you can reorder them from the Hide fields dropdown. Hover over the six-dot grid (⋮⋮) next to the field name, and then drag and drop it to its new position.
Filter for only relevant records
Let's say you have over 10,000 records of customer data in your base, and you want to see only those that have an active subscription. You could manually scroll through and highlight corresponding records one by one, but who has that kind of time? Use filters instead to quickly surface records that meet set conditions.
From the view menu, click Filter.
Set at least one criterion. You can set multiple criteria using conjunctions. In the example below, I created a filter to show writing assignments claimed by me AND the Writing field for those assignments have to be checked.

For more advanced filtering, use condition groups—multiple conditions grouped into separate filters—and then connect those groups using conjunctions.
Group like items
Let's say you want to group records together based on like information, like the status or category. You could use a Kanban view, or, if your heart's set on a different view type, you can use the group tool. It's worth noting that the group tool is available only in grid, timeline, and Gantt views.
In the example below, I've grouped records together by status. The group type selected to group your records will appear at the top of the group, and if it's not one of your hidden fields, it'll also appear as a separate field.

Sort your records by different criteria
You can also group like records together (in a way) by using the sort tool—just note that the groupings won't be as clearly defined as when you use the group tool.
Click Sort, click the field you want to sort by, and then select how you want to order your records. Your options for how to order your records will vary depending on the field type. For example, date fields let you sort from earliest to latest (and vice versa). Or text fields let you sort from A to Z (and vice versa).

Color your records to surface important data
Even with the most fine-tuned filters and groups, if you're still left staring at thousands of rows of data—a wall of text, really—it can be overwhelming to quickly parse the information you need. One way to help distinguish between records: good old-fashioned color coding. For instance, you can designate different colors to tasks based on their status—green for complete, yellow for in progress, and red for delayed.
Click Color in the view menu, and select if you want to color records based on a single select field or on a specific condition. Modify your color settings, as needed, and you're set.
Record coloring is available for all view types, but how those colors are displayed varies based on the view type. For example, in grid view (shown below), a vertical bar filled with the designated colors appears next to each item in the first field. The entire record in calendar view, on the other hand, is filled with color.

Increase row height to see more at once
By default, all rows have a given height. But you can increase the height of these rows, allowing you to see more information at a glance. This is especially useful if you have fields that contain multiple lines of text or image attachments. Or if you simply want to add some visual breathing room between records. The one downside is that this tool is available only in grid view.
Click the Row height icon above your grid, and then select your row height: Short, Medium, Tall, or Extra Tall.

Freeze columns to pin important data
This is another customization option that's available only in grid view: column freeze. By default, the first field (column) of a grid is frozen in place. This way, as you scroll left or right, that field remains visible at all times.
To pin another column in place, first move it to the leftmost side of your grid. Hover over the column border on the right side of your first field until a thick blue bar appears. Drag the bar to the right side of the last column you want to freeze.

Automate Airtable
Curating the perfect Airtable view is fun and all, but without an up-to-date database, you're working with incomplete information. With Zapier's Airtable integration, you can connect Airtable with thousands of other apps, so you can automatically do things like add form entries as new records, copy records from one base to another, or send Airtable data to another app in your tech stack.
Learn more about how to automate Airtable, or get started with one of these workflows.
Add subscribers to Mailchimp via new Airtable records
Add new Airtable records in views to Google Sheets
To get started with a Zap template—what we call our pre-made workflows—just click on the button. It only takes a few minutes to set up. You can read more about setting up Zaps here.
Related reading:
This article also had contributions from Farheen Gani.


