
Notion is unlike any other productivity app I've ever used. It's clean-looking and aesthetically pleasing, and it gives you (almost too much) control over the layout and appearance of anything from docs to dashboards.
In the past, I've developed systems for using Notion as a to-do list, but I always find myself coming back to Todoist as my daily task manager. It has essential features that Notion simply lacks, like recurring tasks and a central task inbox. While I love being able to create complex projects with related action items in Notion, there's no beating Todoist for quick and painless brain-dumping of standalone tasks.
So I set myself a new challenge: how could I jury-rig the perfect project and task management system using my two favorite apps? And friends, I think I've done it—with a little help from Zapier, of course.
In this article, I'll walk you through my ultimate productivity system. It involves a Notion productivity hub template and a couple of automated workflows (called Zaps) that send information between Notion and my Todoist account.
New to Zapier? It's workflow automation software that lets you focus on what matters. Combine forms, data tables, and logic with thousands of apps to build and automate anything you can imagine. Contact sales to learn more.
Table of contents
How my Notion/Todoist productivity system works
In this magical new system, I think of Notion as my project manager, while Todoist is my task manager. I plan projects (and keep tabs on their progress) in Notion, and then break those projects into individual tasks—which Zapier sends to Todoist. That way, when I open Todoist every morning to see the day's tasks, I can be confident all my action items are accounted for.
Then, as I mark tasks completed in Todoist, Zapier finds their corresponding database items in Notion and marks them as done. That way, my Notion databases stay up to date without any tedious double-entry from me.
My Notion hub contains two databases: projects_database (where I store my projects) and action_items (where I store, you guessed it, action items). These databases are related to each other, and the built-in project templates let you create linked action items from within that project.
For example, here's a project I might create for a Zapier article:

When I add tasks to the "to-do" table, they're automatically linked to this project. As I mark those action items as done, the project's progress bar updates to match.
Another fundamental element of this productivity system is categories. I categorize each project as either "Life," "Business," or "Client" work—but you can pick whatever category labels work for you. From there, I further categorize projects by tags, such as "Fitness," "Financial," or "Client Name X." Using tags is optional, but because I like to create multiple dashboard pages in my Notion account, these tags let me have multiple filtered views of my projects and tasks.
For example, here's my Life dashboard:

And here's my Fitness Hub, which displays current fitness projects (on the right) along with a calendar view of upcoming tasks within those projects.

But all that is optional. If you want to use the template in this article on its own, you absolutely can!
Finally, I automate this system by using Zapier to send action items to Todoist. Zapier relies on the project's designated category to know which Todoist project to send a task to. Then, as I complete tasks in Todoist, Zapier marks them as done in Notion as well.
Tour of the Notion template
First, let's explore the Notion productivity template.

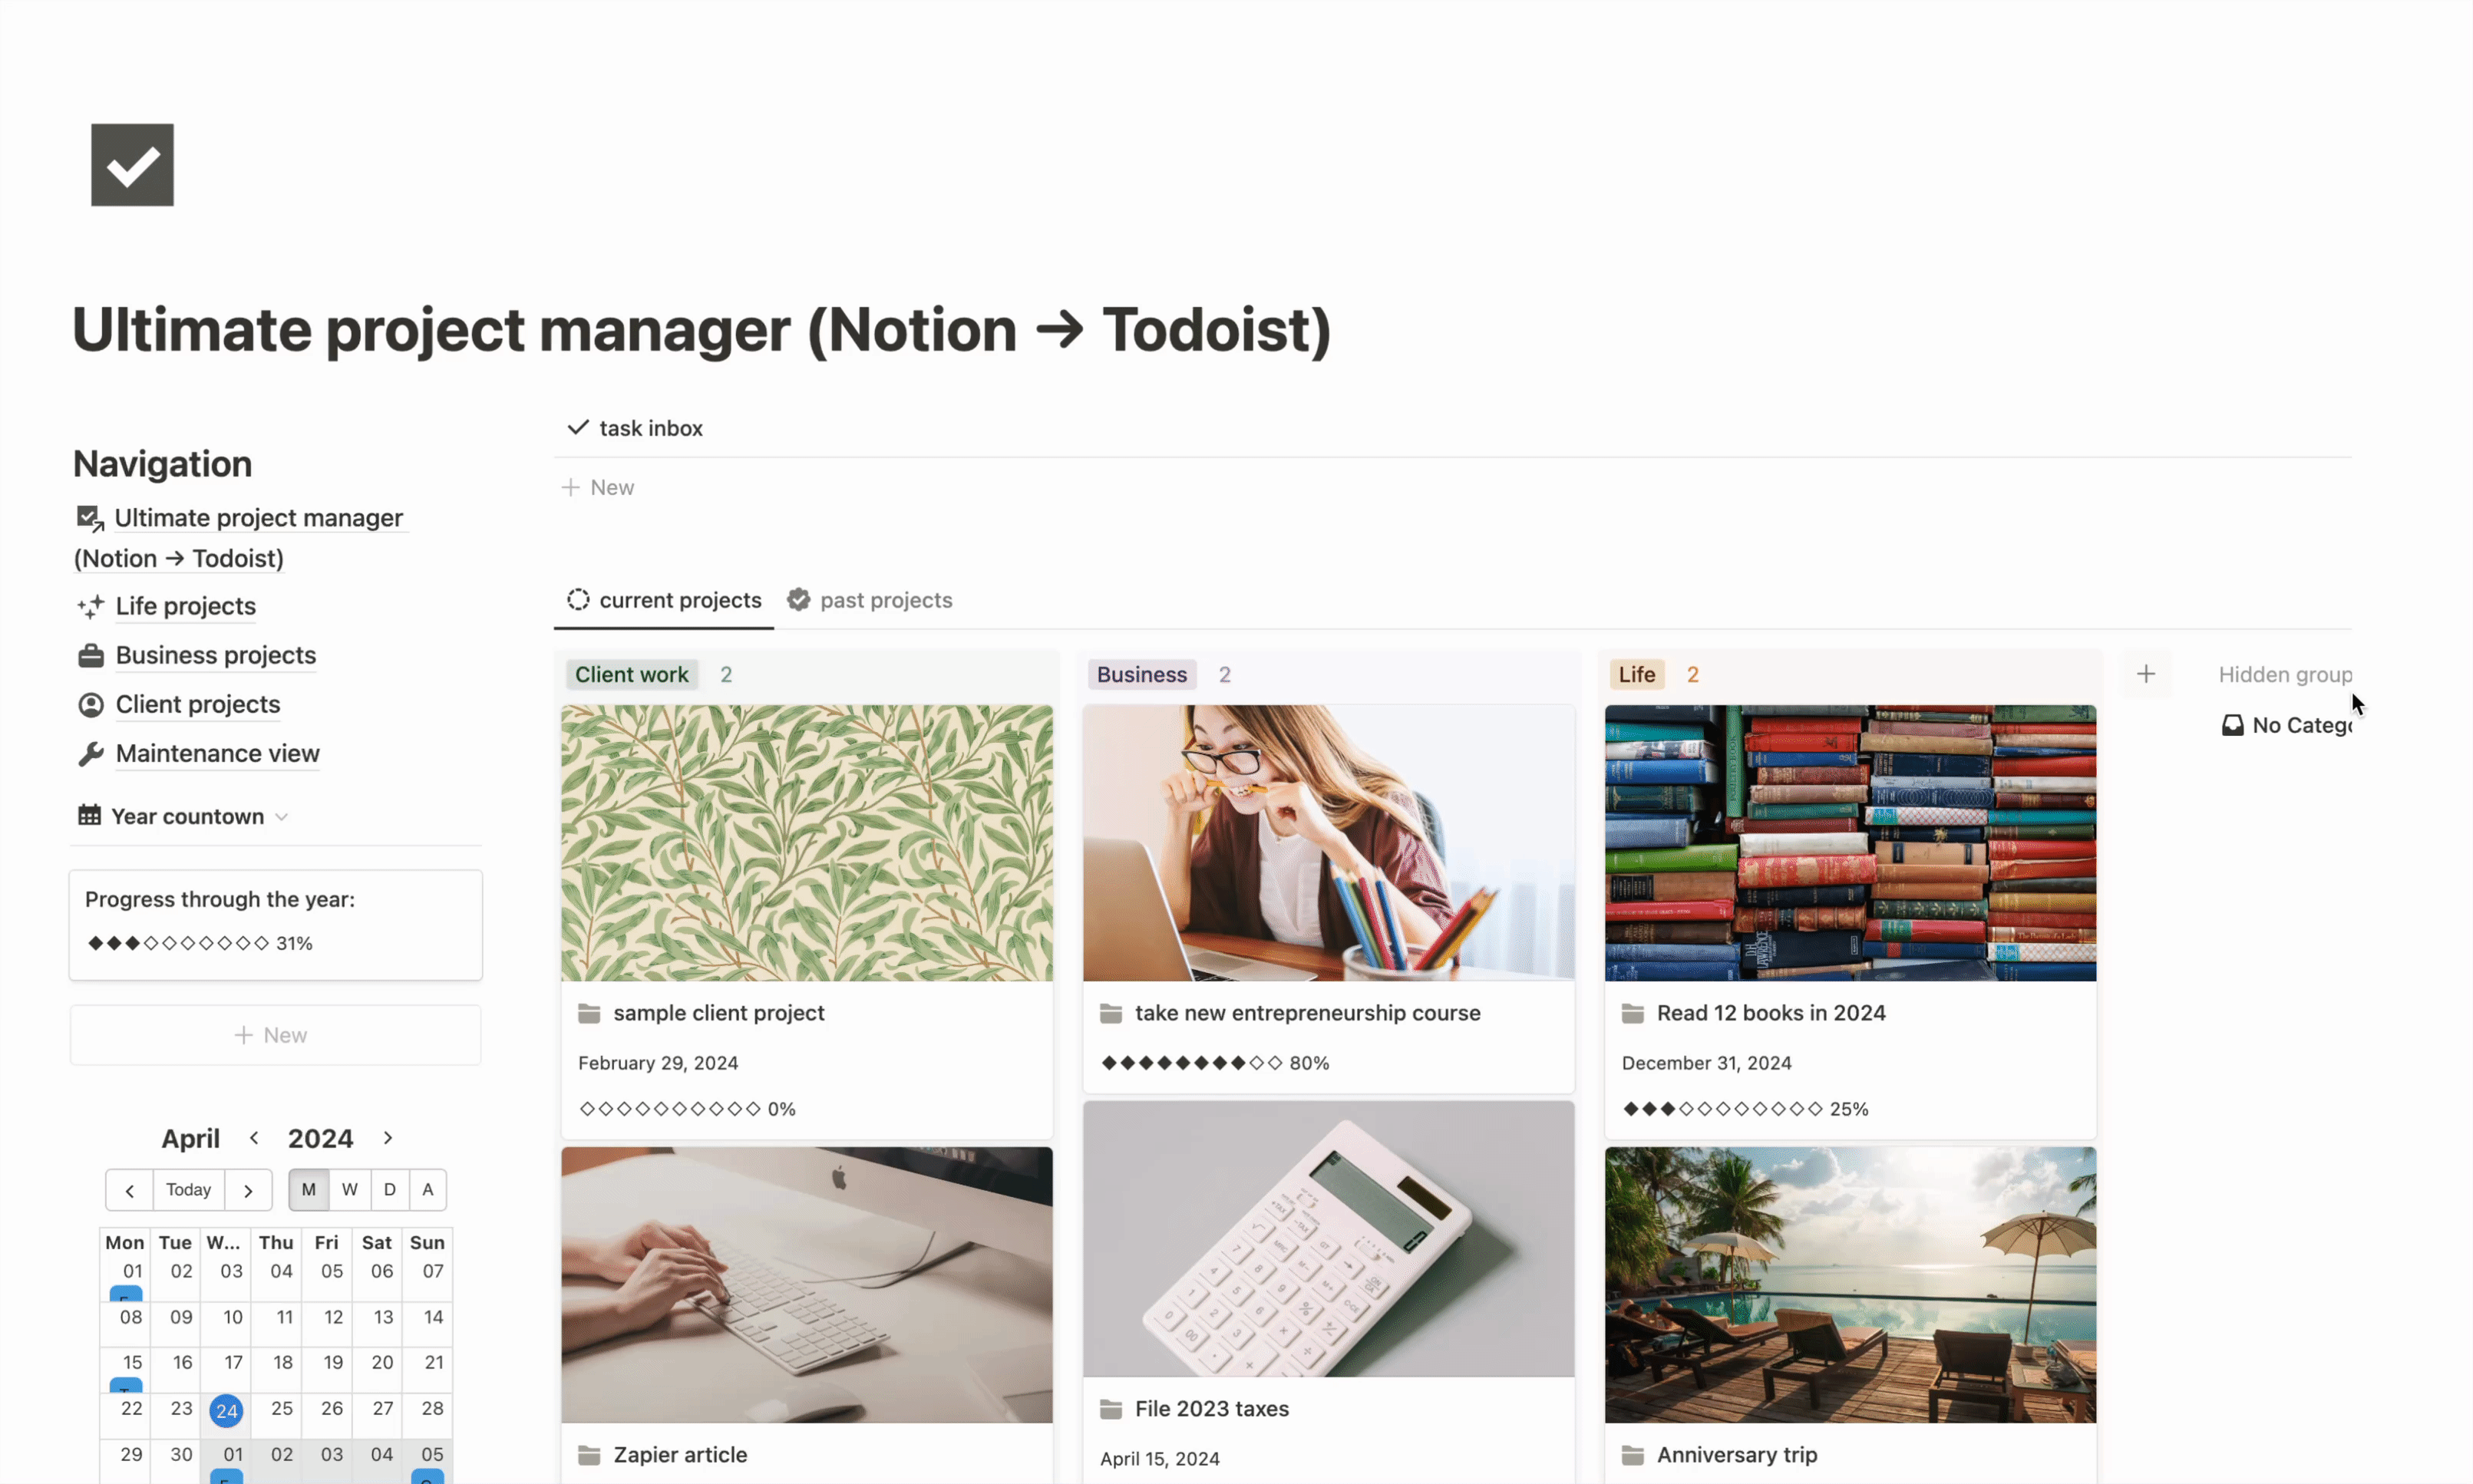
The home page is a dashboard, with a navigation panel on the left and two filtered database views on the right. I also include a "progress through the year" bar and a calendar widget for motivation and a good visual of my current place in time. You can delete these or customize them to your preferences.
The first filtered view is a simple inbox that shows anything in action_items that isn't related to a project. You can use this to brain-dump tasks—and once you've set up the automated workflows below, Zapier will add copies of those action items to your Todoist inbox. (You probably use Todoist to add one-off tasks like "do the laundry," but in case inspiration strikes while you're looking at your Notion dashboard, I added this little inbox for convenience's sake.)
The next filtered view shows all your projects grouped by category. They're sorted by next action date, so you can always be sure of what to work on next.
Using the navigation panel on the left-hand side, you can navigate to sub-pages that filter your projects based on category. For instance, "Life projects" only shows projects in the "Life" category.

The final sub-page is "Maintenance view," where you can see all projects and action items unfiltered and in a table format.

Both project and action item databases live on this page (all the other places where you see them are just filtered views), so don't delete this page.
How to start using the template
Ready to try it for yourself? Follow this link to copy my Notion productivity system template into your own Notion workspace. Just click the Duplicate icon in the upper-right corner.
1. Designate project categories in Notion
Then, start customizing the template to your preferences. I recommend choosing your categories in the Projects database first. The default categories are set to "Life," "Business," and "Client work," but you can change the label to whatever works best with your system.
If you're not familiar with Notion's interface, you can edit all properties by clicking the three-dot menu in the upper right of any database view, and then clicking Properties.

Click on the property you want to change (in this case, Category), and make any edits you like.

I suggest creating a project template in Notion for each category type. There are already templates for the default categories, so you can just edit them by clicking the dropdown next to New, then the three dots next to the template you want to edit, then clicking Edit.
Rename the template to anything you like, then make sure the category looks right. Don't worry about updating any other properties yet.
2. Link Todoist projects to Notion project templates
Now that you've decided on a set of categories for your project management system, you'll need to choose a matching Todoist project for each category. You can create new projects in Todoist or choose projects you already use.
Synchronize each Todoist project with its matching Notion project category. To do this, open Todoist in your browser, navigate to the project, and copy the project ID (the numbers at the end of the project's URL).

Return to Notion and open the corresponding project template. Paste the project ID in the Todoist project ID property.

3. Create new sub-pages for easy organization
This step is optional, but I like to have a sub-page for every project category in my Notion hub. When you designated categories, you may have stuck with three categories and simply renamed the default category labels. If that's the case, feel free to visit each corresponding page and update the page title to match. Easy peasy.
If you're using more than three categories and have already created additional category labels, you can easily add new matching sub-pages to your hub. Start by right-clicking on a sub-page in the navigation menu and clicking Duplicate.

Then, click into the new page and edit the page's title. You should also change the database's filter settings so that it only displays projects matching that page's category.

4. Set up your Zaps
Now that your Notion productivity hub is set to your specifications, it's time to create some automations! Here are the two automated workflows (called Zaps) I use to automate Notion and Todoist:
Zap 1: Send new Notion action items to Todoist as tasks
Before getting started, make sure you've created at least one project with related action items. Then, click the template below to start customizing the Zap:
Send new Notion database items to Todoist, then update the Notion database item
First, set up your trigger app by connecting your Notion account to Zapier. You'll be prompted to sign in.
Then, give Zapier permission to access the Ultimate project manager hub in your Notion account. Click Allow access.

Click Continue. Set up your trigger by choosing the database—in this case, you'll search for action_items.

Click Continue, then Test trigger. Zapier will look for a recent database item to make sure the trigger step is working correctly. Click Continue with selected record.

Now it's time to set up your Todoist action step. Connect your Todoist account, if you haven't already, then click Continue.
Next, customize your action step. Click the Project dropdown and select the Custom tab. Select Properties Todoist Project ID Number from the dropdown. This step tells Zapier to choose whichever Todoist project is associated with the trigger Notion item.

Then, customize the action for how you want your Todoist tasks to look. I mapped the task title, date, and label with the Notion item's title, due date, and project name. But you can also customize the assignee, priority, and notes, if you like.
To map data from your Notion step, just click in the field you'd like to customize, and select the appropriate data from the dropdown menu.
When you're done, click Continue.

Click Test step to test your Todoist action step. Zapier will send a task to your Todoist account. If that step is successful, click Continue.
The final step is to update the Notion database item so that both tasks are linked. In step 3 of the Zap, click the Database dropdown and select action_items.

Next, click in the Item field, select the Custom tab, then select the new database item's ID from step 1 of the Zap.

Then, click in the Todoist Task ID field and select the ID from step 2 of the Zap.

Click Continue, then Test step. Zapier should send the Todoist task ID to your Notion action item.

If that step was a success, you're now ready to use your Zap.
Why not have Zapier create new Todoist projects for each Notion project, you ask? That would be a little simpler than using a category-based system, I admit—but when I tried this for myself, I found that my Todoist sidebar got cluttered quickly with new projects.
And Zapier doesn't offer a way (yet) to automate clutter-clearing tasks in Todoist, like archiving projects when they're done or sorting them into manageable parent folders. So this system works better for me—but feel free to experiment for yourself! As long as your Notion projects and tasks have properties for Todoist project and task IDs, there are a variety of ways you can create automated workflows with Zapier.
Zap 2: Send completed Todoist tasks to Notion
The next Zap updates your Notion action items when you mark tasks complete in Todoist. Start by completing that test Todoist task you created when setting up Zap 1. This will create a trigger event to use when setting up this Zap.
Then, click on the template below and select Try this Zap:
Find and update Notion database items whenever a task is completed in Todoist
First, set up your trigger app. Since you already signed into Todoist in the previous Zap setup, you can choose your Todoist account from the dropdown. Under the trigger setup, leave the project blank so the Zap will watch for completed tasks across all your projects.

Click Continue, then Test trigger. Zapier will search for a recently completed task.

If everything looks right, click Continue with selected record.
In the next step, set up your action by choosing your Notion account from the dropdown. Then, click the Database field and choose your action_items Notion database.

Then, click in the Todoist task ID field and select Task ID from the dropdown. Then click Continue.

Next, click Test step. Zapier should find the Notion action item that matches your recently completed Todoist task. If the test is a success, click Continue.
In the final action step, choose your Notion account from the dropdown once again. In the action setup, choose the action_items database from the Database dropdown.
In the Item field, click the Custom tab and select the ID for the Notion item we found in step 2 of the Zap.

Then, select True in the Done field. Click Continue.

Finally, click Test step. Zapier will mark that Notion item as "done."

If the test is successful, click you're now ready to use your Zap.
5. Start using the system!
And voila, your productivity system is ready for use. Add new projects as needed in Notion (make sure to use project templates), then create action items from within each project. Zapier will add new action items to your Todoist automatically.
I like to group my Todoist views by label, which keeps me organized by Notion project. For example, here's my "Client projects" project in Todoist:

And here's the same Client projects page in my Notion dashboard:

Whenever you complete a Todoist task, Zapier will update that item in Notion. You'll see the status of your Notion projects via the automatic progress bar.
Once a project is complete, you can manually switch its Status property from "To-Do" to "Done" (or "Abandoned"). Alternatively, you can rely on the Status (auto) property to automatically mark the project as done once all tasks have been completed. Feel free to delete or hide whichever Status property you don't want to use, and adjust your filter view(s) accordingly.
Get ready for the best of both worlds
Because this system isn't a perfect two-way sync for tasks, I only recommend trying it if you like the idea of setting and forgetting tasks in Notion, then doing day-to-day executive management in Todoist. But if that sounds like you, this system will streamline your task management system and cut out monotonous copying and pasting across apps.
If, like me, you're addicted to the beautiful design and endless customizability of Notion—but you also want a simple, reliable to-do list app that keeps your daily task list clutter-free—I encourage you to give this system a try. I hope you'll find it as easy and satisfying to use as I have.


